6 Steps To Magento Development Process For Beginners
- TECHVIFY Team
- 0 Comments
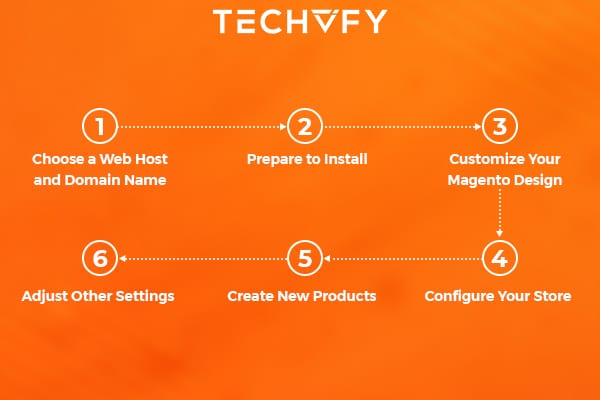
As introduced in previous posts, Magento is an ideal platform for building your E-Commerce website. To detail the Magento development process, TECHVIFY will introduce you to a Magento development tutorial, including 6 basic steps to follow.

Step #1: Choose a Web Host and Domain Name
Choosing the best web hosting is the first thing we recommend you do in the Magento development tutorial. Because further steps will depend on the hosting plan and the chosen provider, you should consider it wisely before starting the Magento development process.
Magento is a powerful platform with certain requirements for server resources. You’ll look for a web host based on your list of system requirements. Moreover, it’s wise to play it safe and choose a provider that specifically includes support for the platform you will be using.
Some popular hosts that offer one-click installation options for Magento include:
- Bluehost
- Hostinger
- DreamHost
A key element to securing the right host for your Magento store is to make sure the plan you’ve selected includes an SSL certificate. If you intend to integrate your E-Commerce site with payment gateways, this is a crucial part of ensuring your security.
Many providers offer domain name registration as part of your hosting package. The domain name will act as your website’s address and be a key part of your brand. It will affect your brand awareness, SEO rankings, and overall business reputation. Therefore, you should take this step responsibly and choose a domain name wisely.
If the domain name is unavailable, pick a URL that communicates your brand value, is unique and catchy, and includes target keywords rather than hyphens and numbers.
Step #2: Prepare to Install
To develop an E-Commerce website in Magento, you should visit the official website, download the latest Magento version, and install it. Generally, there are three options: Composer, Git, and by downloading a zip/tar archive.
It will guide you through the main installation steps, such as:
- Addition of a Database
- Web Configuration
- Store Customization
- Installing Magento
You’ll also have to consider administration configurations, like your admin username and password as well as the URL path to your admin login page.
Step #3: Customize Your Magento Design
If you want your online store to attract more potential customers, your online store should be eye-catching, responsive, and device friendly. To do so, you should choose a theme that will attract user attention and extend their sessions on your site.
Therefore, the next step in the Magento development tutorial is to choose a Magento theme. There are many options for you to choose from. You can use a default theme, shop for them from online providers such as Xmage2, customize it to your needs, or develop a new theme from scratch.
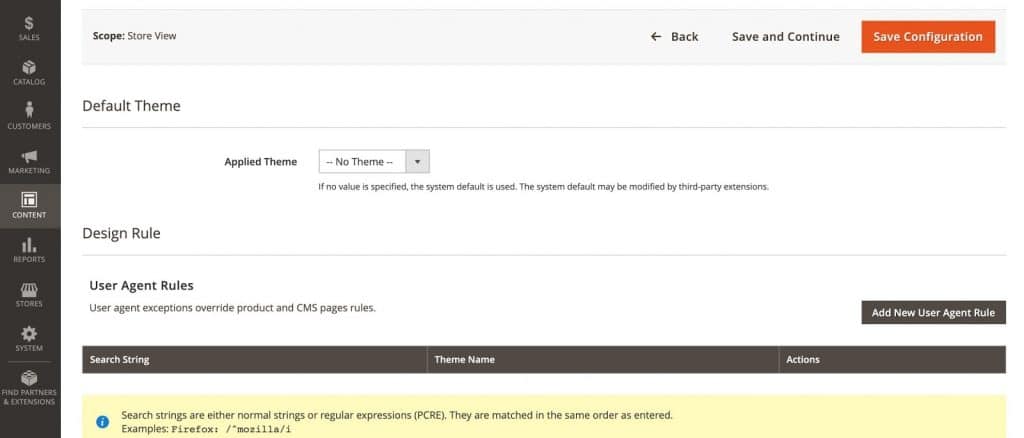
To install a theme, you’ll need to upload theme files and folders to the server and configure it from the admin panel. To use and activate a new design, go to the Admin Panel > Content > Configuration > Edit > Select your theme in the drop-down menu > Save.
Step #4: Configure Your Store
To proceed with the Magento development process, you need to configure your store’s appearance. Go to the Content section in the sub-menu, you’ll see such items as Pages, Blocks, Widgets, Posts, and Comments. These items allow you to edit and add pages, blocks, widgets, etc., correspondingly. Use them to adjust the appearance and add new content to your store.

Under the Content menu tab, you’ll also see the Configure item. This is where you can adjust a number of store options, including header, footer and pagination display, product watermarks, and other options.
Step #5: Create New Products
After setting the foundation of your E-Commerce website, it’s time to import your product information. These are Magento development tutorials to add a product:
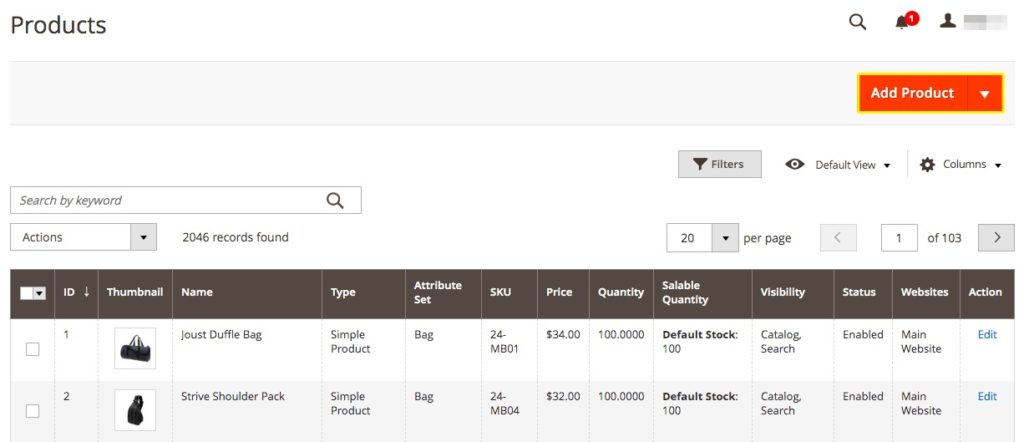
- Navigate to Products > Catalog > Add Product.
- In the Product Details tab, fill in important product information.
- The images and Videos tab lets you add multimedia for the product.
- The search Engine Optimization tab allows you to enter keywords and metadata for the product.

For a more detailed product setup, select the Advanced settings tab where you can configure Advanced Pricing, Advanced Inventory, Custom options, Related products, Up-sells, Cross-sells, Design, and Auto settings.
- Simple products: A standard physical product.
- Configurable products: Simple products that come in multiple variations.
- Grouped products: A collection of simple products that can be purchased individually or together.
- Virtual products: Services, online courses, or other ‘products’ that don’t require shipping or downloading.
- Bundle products: A collection of items that cannot be purchased separately.
- Downloadable products: Digital products that can be downloaded, such as e-books.
After choosing a product, fill in product information in a Product Details tab: the attribute set, description, SKU, product’s weight, price for the product, tax class, product type, and name.
When you’re finished, click on the Save button in the top right corner. If you’re ready for your product to go live on your site, make sure the Product Online switch is on as well.
Step #6: Adjust Other Settings
In fact, there are a couple more things you’ve got to take care of before you can go live. What exactly you need depends on your niche and the extensions you use in your store. Here’s what you have to do in the Configuration tab before going live:
- Configure payment and shipment methods, prices, and tax rules.
- Set up your site’s contact form and change your Google Maps address.
- Add some content to your store’s Blog section, newsletter, or social media.
- Power a newsletter popup using an extension. It’s a must-have for extending your loyal customer pool.
- Install new languages and translate your website.
- Secure your website with SSL certification.
- Configure the top navigation of your website, incorporating MegaMenu panels for increased usability.

Here are 6 steps Magento development tutorial for beginners. Make sure to follow our guide to ensure the Magento development process.
Learn more about Magento best practices: Magento development best practices for your E-Commerce website


