


Magento Theme Development Tutorial: A guide for beginners
- TECHVIFY Team
- 0 Comments
Magento development plays an undeniably crucial role in creating an E-Commerce website.
To really upgrade your online store, businesses should spend a good investment in Magento theme development. It is the decisive component in designing the whole look, mood, and aesthetic of your website.
Let TECHVIFY introduce to you a step-by-step guideline for Magento Theme Development. By fully acknowledging these steps, you can better view this whole process.
Learn more: Top 7 Magento Development Best Practices
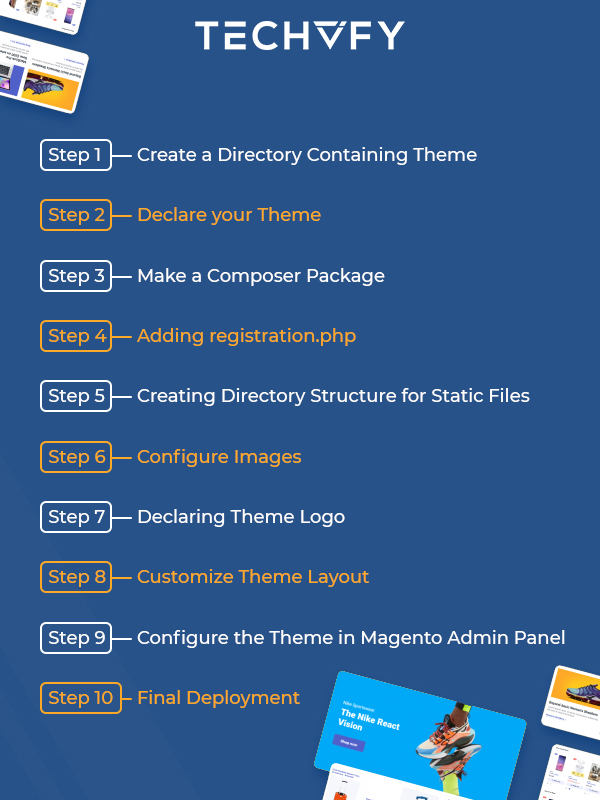
Step #1: Create a Directory Containing Theme
- Go to: /app/design/frontend and create a new directory with the vendor name you want for the theme package: /app/design/frontend/<Vendor>.
- Under the vendor>directory, create a directory named according to your theme.
app/design/frontend/
├── <Vendor>/
│ │ ├──…<theme>/
│ │ │ ├── …
│ │ │ ├── …
After creating this structure, you need to declare your theme so that Magento knows it exists. You can set your theme as the current theme in your Magento backend.
Step #2: Declare your Theme
You must create a theme.xml file containing the theme name to declare your theme. If the theme inherits from a parent theme, the .xml file should also include the parent theme name. The theme preview image is also required if necessary.
- Add or copy from an existing theme.xml file to your theme directory app/design/frontend/<Vendor>/<theme>.
- Configure it using the following example:
<theme xmlns:xsi="http://www.w3.org/2001/XMLSchema-instance" xsi:noNamespaceSchemaLocation="urn:magento:framework:Config/etc/theme.xsd"><title>m2-theme</title>
    <parent>Magento/<theme></parent>
    <media>
    <preview_image>media/m2-theme-image.jpg</preview_image>
    </media>
    </theme>
In the <title> tag, insert the name of your theme. In the <parent> tag, you can specify the parent theme for fallback purposes.
The theme image in the <preview_image> tag is a thumbnail image, which shows the theme page for preview purposes. The thumbnail image is in app/design/frontend/<theme>/m2-theme/media/m2-theme-image.jpg.
If you change the theme title or parent theme information in theme.xml after a theme is already registered, you need to open or reload any Magento Admin to save changes in the database.
Step #3: Make a Composer Package
Magento 2 themes are distributed as Composer packages so that they will be registered as a Package on the server. Add a file composer.json which is optional.
The composer.json file provides theme dependency information. Refer to a current theme.xml file for the correct dependencies and their versions.
Example of a theme composer.json file:
{
    "name": "<vendor>/m2-theme",
    "description": "Magento 2 Theme Customization",
    "require": {
    "php": "~5.6|~7.0|~7.1|~7.2|~7.3|~7.4",
    "<vendor>/m2-theme": "100.0.*",
    "magento/framework": "100.0.*"
    },
    "type": "magento2-theme",
"version": "100.0.1",
"license": [
"OSL-3.0",
"AFL-3.0"
],
"autoload": {
"files": [
"Registration.php"
]
}
}
Step #4: Adding registration.php
To register your theme in the system, add a file registration.php in your theme directory with the below content:
<?php
    /**
    Copyright © Magento, Inc. All rights reserved.
    See COPYING.txt for license details.
    */
    \Magento\Framework\Component\ComponentRegistrar:: register;
    \Magento\Framework\Component\ComponentRegistrar::THEME,
    'frontend/<Vendor>/<theme>',
    __DIR__
);
<Vendor> is your vendor name and <theme> is the theme code.
Step #5: Creating Directory Structure for Static Files
The theme package consists of many types of files: styles, fonts, JavaScript, and images. Each type should be stored in its own sub-directory of web in your theme directory:
app/design/<area>/<Vendor>/<theme>/
├── web/
│ ├── css/
│ │ ├── source/
│ ├── fonts/
│ ├── images/
│ ├── js/
In the …/<theme>/web/images directory, you store the general theme-related static files.
Step #6: Configure Images
Product image sizes and other properties used on a theme are configured in a view.xml configuration file. It is required for a theme but is optional if it exists in the parent theme.
If the product image sizes of your theme differ from those of the parent theme, or if your theme does not inherit from any theme, you will need to add view.xml.
Copy the view.xml file from the etc. directory of the parent theme or copy it from the Blank theme. Configure all storefront product image sizes in the view.xml file.
<image id="category_page_grid" type="small_image">
<width>250</width>
<height>250</height>
</image>
Step #7: Declaring Theme Logo
In the Magento application, a logo image’s default format and name is logo.svg. You can use a logo file with a different name and format, but you might need to declare it.
To declare a theme logo, create Magento_Theme/layout directories and add the following code to a default.xml file. The default.xml file path is /app/design/frontend/<theme>/m2-theme/Magento_Theme/layout/default.xml.
<page xmlns:xsi="http://www.w3.org/2001/XMLSchema-instance" xsi:noNamespaceSchemaLocation="urn:magento:framework:View/Layout/etc/page_configuration.xsd">
<body>
<referenceBlock name="logo">
<arguments>
<argument name="logo_file" xsi:type="string">images/m2-logo.png</argument>
<argument name="logo_img_width" xsi:type="number">350</argument>
<argument name="logo_img_height" xsi:type="number">350</argument>
</arguments>
</referenceBlock>
</body>
</page>
Step #8: Customize Theme Layout
Once your basic theme structure is created, now you can customize or override any layout and set up a new design layout for your new theme.
To override the theme layout, you need to put the layout file with the same name in the following location: /app/design/frontend/Magento/<theme>/Magento_Theme/layout/default.xml
These files override the following layouts: /<vendor>/m2-theme/Magento_Theme/layout/default.xml
Step #9: Configure the Theme in Magento Admin Panel
The next step is to apply the custom theme you created from Magento Admin to your website: Go to Admin->Content->Design->Configuration
Click Edit on your store view, you will see a page with a designed configuration. On the Default Theme tab, select your newly created theme in the Applied Theme drop-down and Click Save Configuration to apply the theme.
Step #10: Final Deployment
To make the theme visible on the Magento storefront, we have to run one command to deploy the files:
- Log in to your Magento store SSH account
- Go to Magento root directory and run the below command:
php bin/magento setup:upgrade- Run another command to deploy the theme files:
php bin/magento setup:static-content:deployNow your theme is ready to be used.
That’s all you need to know about the Magento theme development process. Make sure you know the procedure to every detail to utilize all the best features of Magento development.

Or if you find this process too complicated to understand, you should choose a trustworthy web development team. TECHVIFY Software is a Magento development specialist whose ultimate goal is to create the best E-Commerce website that can meet all of the client’s requirements. With TECHVIFY, you can rest assured that your online store is in good hands.